Images make a WordPress site feel credible, polished, and useful, but they are also one of the most common causes of slow-loading pages. Large image files, oversized dimensions, weak compression, and poor delivery can hurt page speed before the visitor reads the first paragraph.
A good image optimization workflow for WordPress reduces that weight without making images look cheap or blurry. The goal is not to make every file as small as possible. The goal is to preserve useful visual detail while improving load speed, layout stability, crawlability, and image SEO.
Should You Use WebP Or AVIF On WordPress?
Use WebP as the default for WordPress images because it is widely supported and usually much smaller than JPEG. Add AVIF when your image plugin or CDN can serve browser-safe fallbacks. AVIF can save more weight, but fallback handling keeps older browsers, crawlers, and previews from receiving broken media files.
Why Image Optimization Matters For WordPress
WordPress makes it easy to upload images, but that convenience can hide performance problems. A photo exported from a phone, camera, or design tool may be several megabytes and far wider than the space it occupies on the page. If that image is placed in a hero, gallery, blog post, service page, or product section without optimization, the browser downloads unnecessary data.
- Visitors wait longer for important content to appear.
- Mobile users spend more data than needed.
- Largest Contentful Paint can suffer when the main image loads slowly.
- Layout shift can increase when images lack dimensions.
- Image SEO can weaken when filenames, alt text, context, and delivery are neglected.
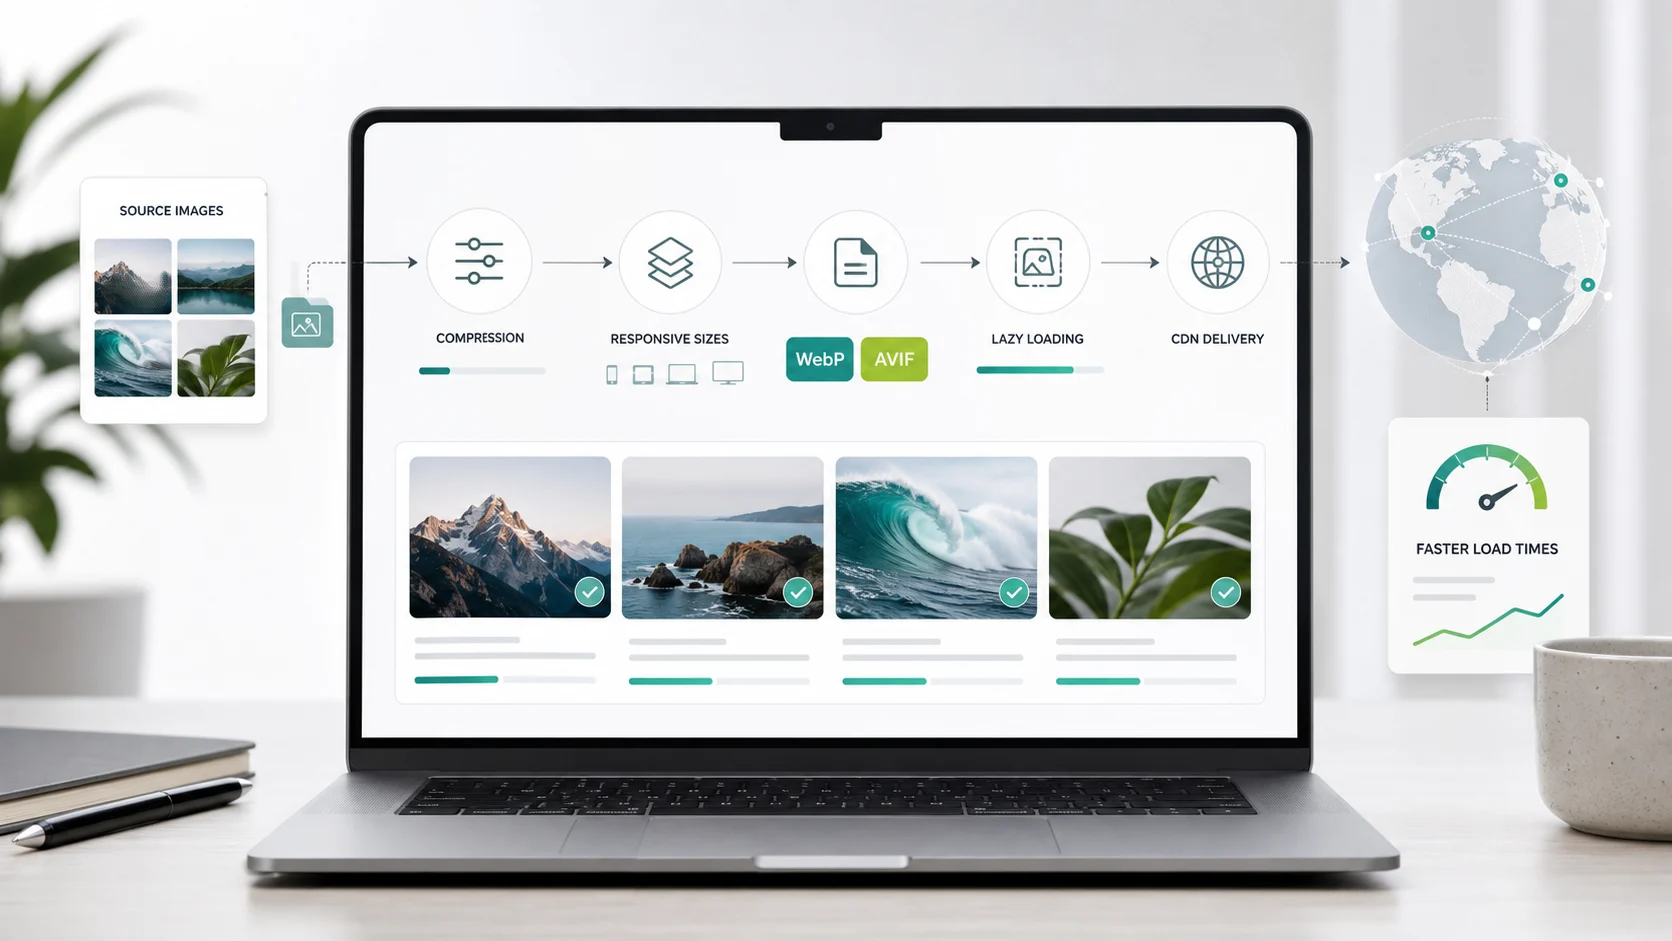
Image optimization is part of broader website performance. It connects file preparation, responsive images, compression, modern formats, CDN delivery, lazy loading, and post-publication monitoring.
The Best Image Optimization Workflow For WordPress
A practical workflow starts before upload and continues after publication. This keeps the media library cleaner and prevents performance debt from building across hundreds of posts and pages.
1. Choose The Right Image Before Uploading
Start with the correct source image. High resolution is useful for editing, but a 5000-pixel-wide file is usually unnecessary for a content column that displays at 800 pixels wide. Before uploading, confirm that the image supports the reader’s decision, explanation, or trust in the page.
For screenshots, crop away unnecessary browser chrome. For product, team, or service images, crop around the subject. For decorative images, decide whether the visual is worth the extra page weight at all.
2. Resize Images To The Display Need
WordPress creates responsive image sizes in many themes, but the original upload still matters. Uploading massive source files can waste storage, slow image processing, and create larger-than-needed derivatives.
| Image Use | Suggested Width |
|---|---|
| Blog content image | 1200-1600 px |
| Full-width hero image | 1600-2200 px |
| Small card thumbnail | 600-900 px |
| Logo or icon | Use SVG when appropriate, or a tightly sized PNG/WebP |
| Screenshot | Crop and resize to the visible detail needed |
3. Pick The Best Image Format
Modern WordPress image optimization often centers on WebP and AVIF, but JPEG and PNG still have a role. The safest workflow is not “convert everything blindly.” It is choosing the right format for the image and serving fallbacks where needed.
| Format | Best For | Typical Size | Quality | Support |
|---|---|---|---|---|
| JPEG | Photos and legacy workflows | Medium | Good | Excellent |
| PNG | Transparency and sharp screenshots | Large | High | Excellent |
| WebP | General WordPress images | Small | Very good | Broad |
| AVIF | Photos where smaller files matter most | Very small | Very good | Good, with fallback recommended |
| SVG | Logos, icons, and vector artwork | Tiny | Sharp | Broad, with security care |
For most sites, WebP is the dependable default. AVIF is useful when your plugin or CDN handles fallback delivery automatically. PNG should be reserved for images that need transparency or crisp interface detail.
4. Compress Images Without Damaging Quality
Compression reduces file size by removing unnecessary data. Lossless compression is safer but usually saves less. Lossy compression can save much more, but aggressive settings may create blur, banding, artifacts, or rough edges.
The right compression level depends on the image. A product photo needs more care than a background image. A screenshot with text may look poor if compression is too strong. Test the result visually, especially on mobile.
5. Automatically Optimize Images On Upload
A strong workflow should not depend on editors remembering every step manually. Configure your image optimizer to compress images on upload, create modern formats, and resize files above a maximum dimension.
- Compress images when they enter the media library.
- Resize large uploads above a defined width.
- Generate WebP versions as the default modern format.
- Generate AVIF only when fallback delivery is reliable.
- Keep originals if the workflow needs rollback.
- Bulk optimize existing images in controlled batches.
Smush, EWWW Image Optimizer, And Plugin Choice
There is no single best image optimization plugin for every WordPress site. The right choice depends on hosting, CDN, budget, image volume, and how much control the team needs.
Smush is widely used for compression, resizing, lazy loading, and media library optimization. EWWW Image Optimizer is another established option for compression, WebP conversion, bulk optimization, and automatic processing. When comparing tools, focus on the workflow rather than the brand name alone.
| Feature | Why It Matters |
|---|---|
| Compression control | Prevents visible quality loss from overly aggressive settings |
| WebP support | Improves file size while keeping broad compatibility |
| AVIF support | Can reduce file size further when fallback handling is strong |
| Bulk optimization | Helps clean up existing media library files |
| CDN integration | Improves delivery speed for users in different locations |
Use Lazy Load Carefully
Lazy loading delays offscreen images until the visitor is close to seeing them. This can reduce initial page weight on long posts, landing pages, and galleries. The important detail is that not every image should be lazy loaded.
Do not lazy load the primary hero image or the main image likely to become Largest Contentful Paint. That image should be discoverable and load quickly. Lazy loading is better for supporting graphics, gallery items, related post thumbnails, and decorative images lower on the page.
If the page still has slow render timing after image cleanup, review JavaScript and CSS too. Image optimization works best alongside fixes for render-blocking resources in WordPress.
Use A CDN For Faster Image Delivery
A CDN stores and serves assets from locations closer to the visitor. For image-heavy WordPress sites, that can reduce latency, origin server load, and delivery time.
A strong image CDN may also convert images to WebP or AVIF, resize images dynamically, and serve the best supported format for the browser. That can simplify the workflow when configured correctly. If you are comparing options, start with this guide to the best CDN for WordPress.
Avoid duplicate processing where a plugin creates WebP files and the CDN also transforms images in a conflicting way. One clear image delivery path is easier to monitor, validate, and debug.
Improve Image SEO While You Optimize
Image SEO is part of the workflow. Use descriptive filenames before upload. A filename like wordpress-image-optimization-workflow.webp is more useful than IMG_4829.webp. Add alt text when the image conveys information, and avoid stuffing keywords into alt attributes.
- Rename images before uploading.
- Add accurate alt text.
- Use captions when they help readers.
- Keep images relevant to nearby headings and paragraphs.
- Use responsive images and explicit dimensions.
- Serve WebP or AVIF with fallback support.
How To Optimize Existing WordPress Images
If your site already has a large media library, start with a controlled cleanup. Back up the site and media library first. Then review the largest images, key landing pages, and high-traffic posts. Run speed tests before changes so you have a baseline.
Next, configure the optimizer, choose compression settings, enable resize rules, and decide whether to generate WebP or AVIF. Test a small batch before running a full media library optimization. Then check the result visually on desktop and mobile.
Recommended WordPress Image Optimization Workflow
- Select only images that support the page.
- Crop and resize images before uploading when practical.
- Upload images with descriptive filenames.
- Compress images automatically on upload.
- Generate WebP as the default modern format.
- Add AVIF when fallback delivery is reliable.
- Use responsive image sizes.
- Do not lazy load the main LCP image.
- Lazy load below-the-fold images.
- Use a CDN when image delivery needs to be faster.
- Add alt text, captions, and structured context.
- Recheck page speed and visual quality after publishing.
Common Mistakes To Avoid
The most common mistake is uploading large images directly from a camera, phone, or design export without resizing. Another is using maximum lossy compression on every file, which can damage trust when product photos, screenshots, or brand visuals look degraded.
Some site owners enable every feature in every plugin, then add a CDN with overlapping image transformation. That can create duplicate files, inconsistent delivery, or confusing debugging. Keep the image delivery path simple enough to verify.
FAQ
What Is WordPress Image Optimization?
WordPress image optimization is the process of resizing, compressing, converting, lazy loading, and delivering images efficiently so pages load faster while preserving visual quality.
Is WebP Better Than JPEG For WordPress?
WebP is usually better for WordPress because it often creates smaller files at similar visual quality. JPEG is still acceptable, but WebP is a stronger default when supported.
Should I Use AVIF On WordPress?
Use AVIF if your plugin or CDN can serve fallback formats automatically. AVIF can reduce file size more than WebP, but WebP is still the safer default for broad compatibility.
Can An Image Optimization Plugin Fix Old Images?
Yes. Many plugins can bulk optimize existing media files, resize large images, compress uploads, and generate WebP versions. Test a small batch before optimizing the full library.
Does Image Compression Hurt SEO?
Image compression usually helps SEO when it improves page load speed and keeps visual quality acceptable. It can hurt user experience if compression is so aggressive that images look blurry or damaged.
Final Takeaway
WordPress image optimization works best as a repeatable workflow, not a one-time plugin install. Resize images before upload when practical, compress images on upload, use WebP as the dependable modern format, add AVIF with fallbacks, lazy load below-the-fold images, and use a CDN when image delivery needs to be faster.
The right setup keeps WordPress images sharp, lighter, and easier to crawl. It also protects performance as the site grows.